SMOG & ESP8266 Part 1: Quick and snappy SMOG Sensor with WiFi interface – The Basic Version
SMOG & ESP8266 Part 1: Quick and snappy SMOG Sensor with WiFi interface – The Basic Version
Recently, we built a smog sensor which measures PM2.5 and PM10 ppm particles common in SMOG. This time let’s focus on something easy to do, without deliberations on extending life of the sensor. The Nova Fitness SDS011 (also versions 018 or 015) has proven to be quite accurate, with a good life expectancy, even with nearly theoretical unsupported air humidity above 70%. Today I will try to show you the mobile version of the sensor, using the cheapest elements, and then expand it with a temperature and humidity sensor, display – up to the cloud version. To start with – let’s build the basic version.
NOTICE: The ESPEasy MEGA 2.0 software that we use here – has been updated in January 2018 with much better SDS011 support. When finished with this version check out the updated one (fourth version)
===
This is a very easy project that can be completed withinin 10 minutes.
Flash the software, connect 3 cables and read the result via WWW. Something that can be shown at school (or as a school project) or at the local community – as an effective SMOG meter.
What will you need?
Hardware
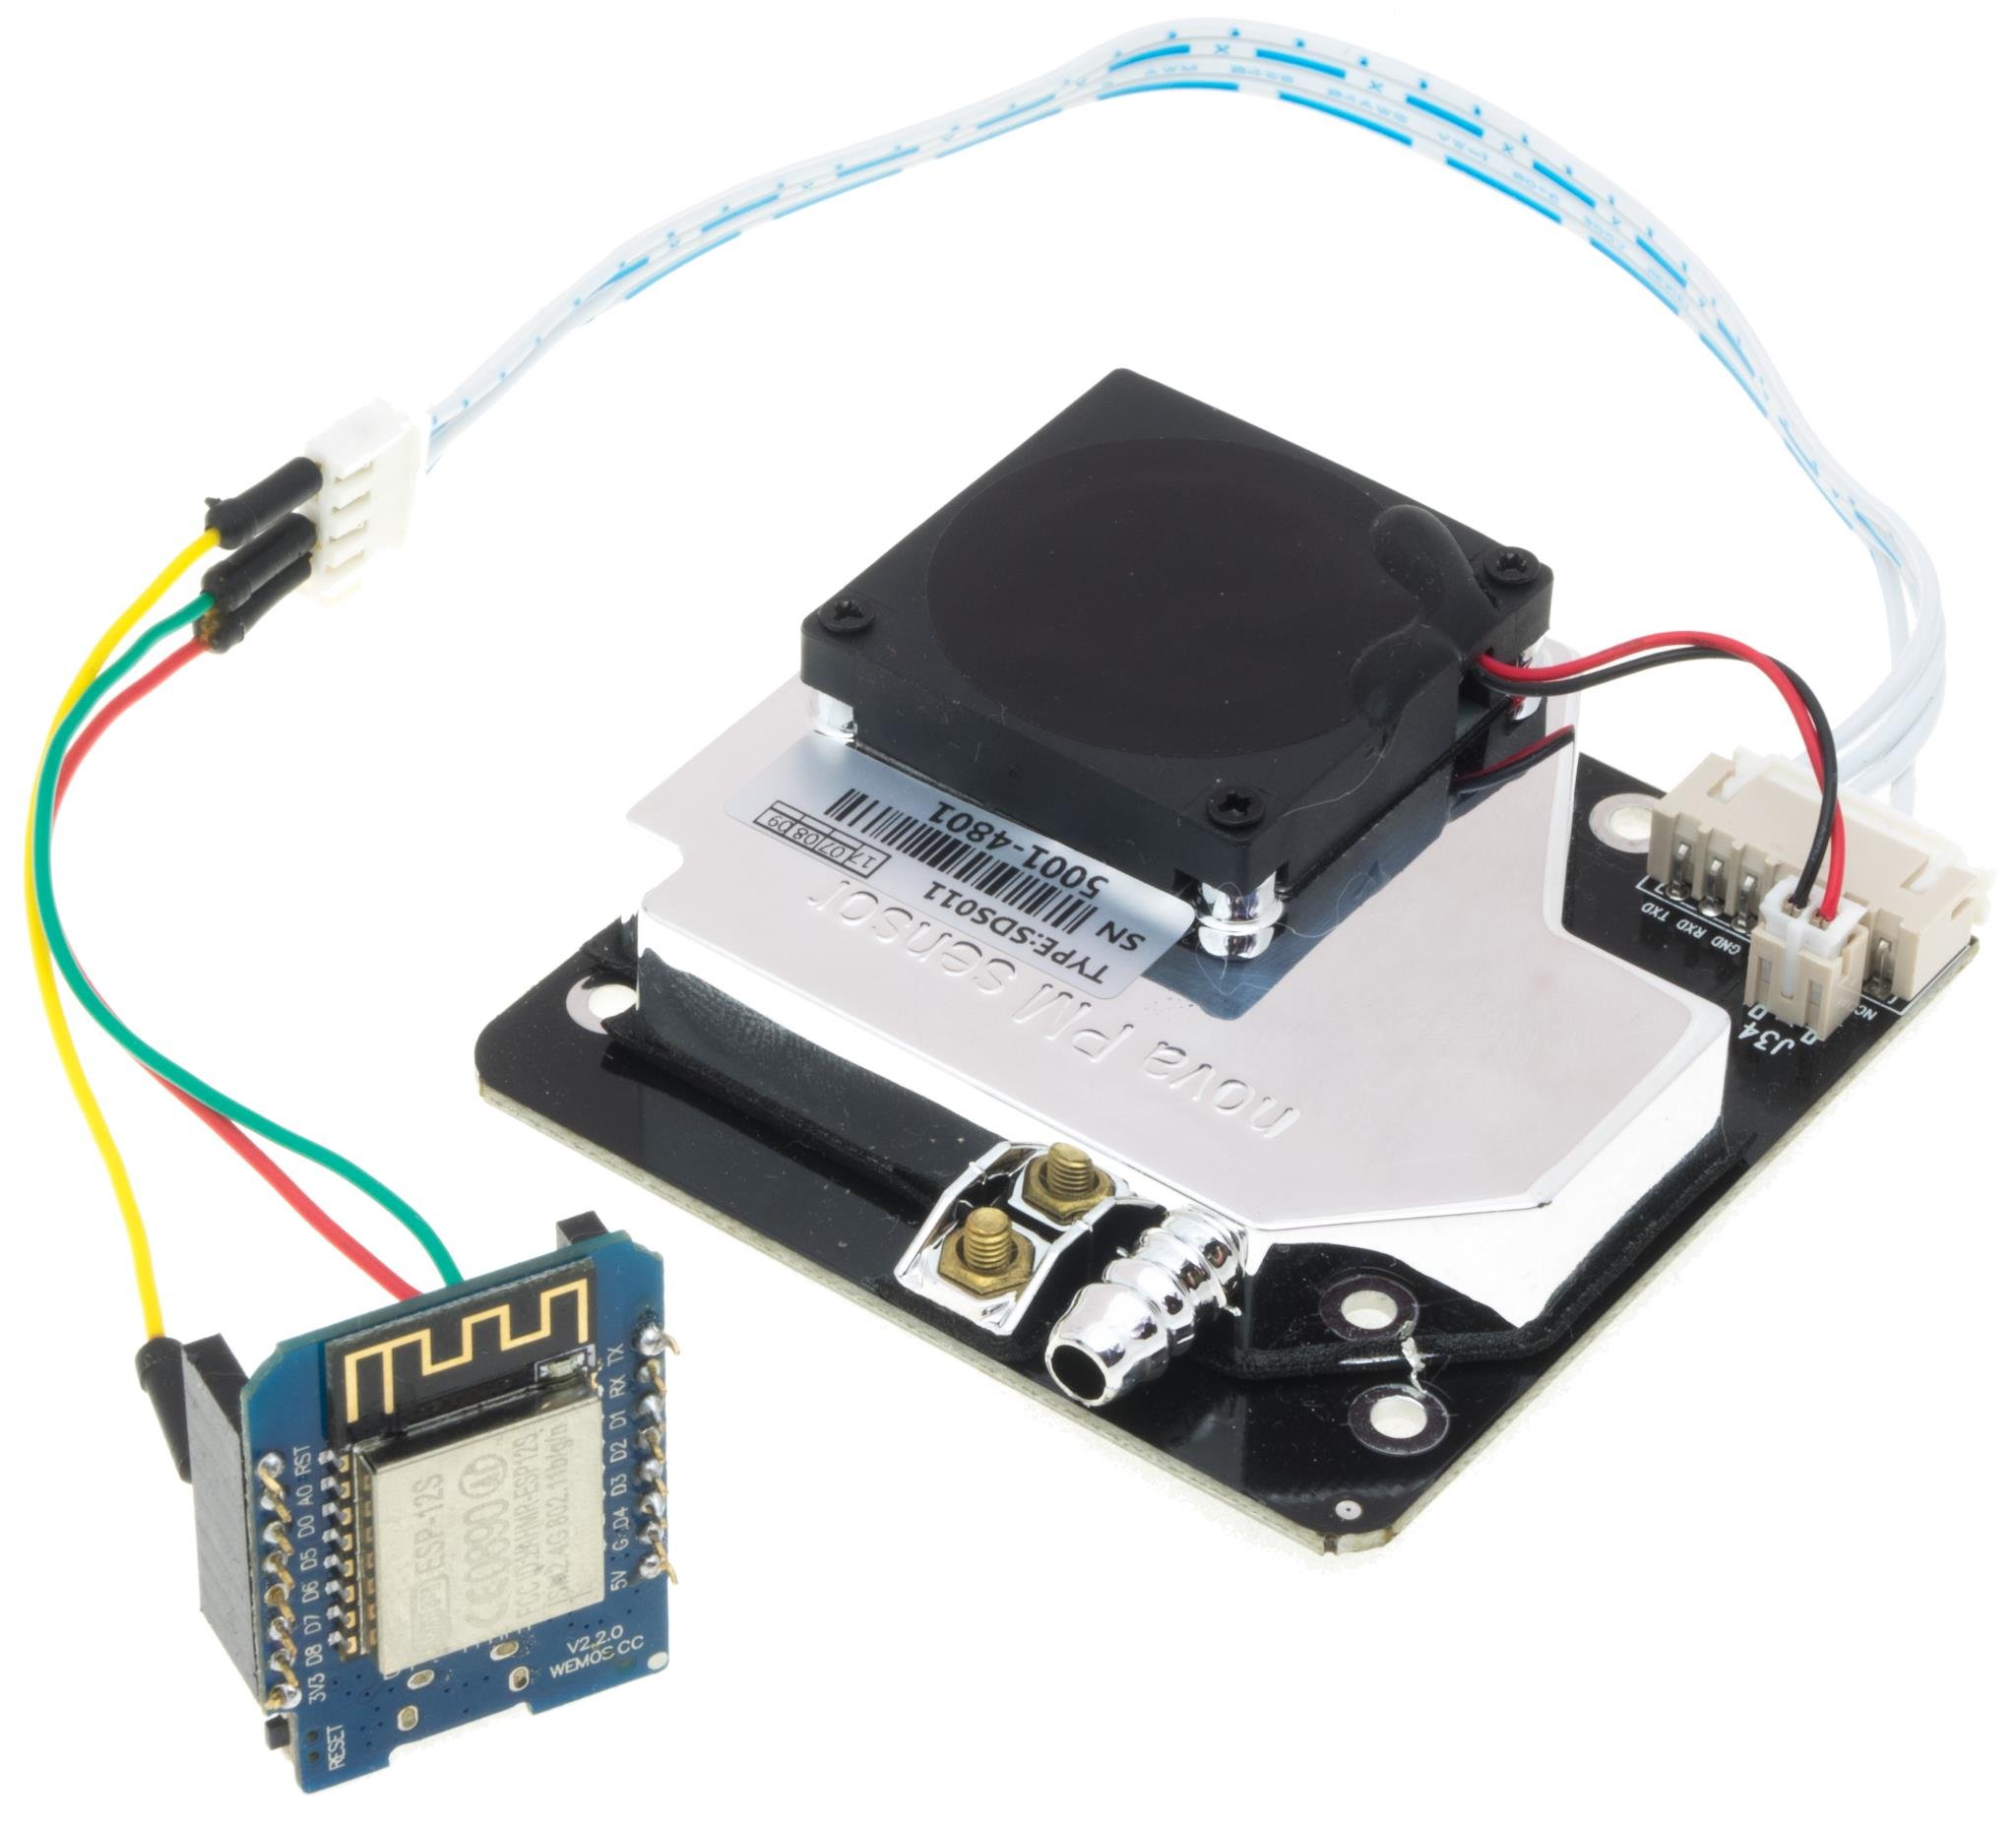
- Board with ESP8226 – it's best to use either NodeMCU v2 or Wemos D1 mini boards. We’ll use Wemos here. The ESP8266 comes with a convenient USB interface for 5V power supply and “flashing”. At the same time, such boards have additional features – the RESET and/or FLASH buttons, correctly puts them into the “Deep Sleep” mode, and have the most recent versions – ESP-12S, with better antenna. It is important that we need the ESP8266 version with 4MB FLASH (32Mbit) – the NodeMCU, or Wemos D1 – have exactly this ammount of FLASH memory.
The device itself should cost around $ 4- $ 5 with shipping, or a little more expensive in stores on-site in your country. - SMOG Sensor Nova Fitness SDS011. As before, we will use a well-known sensor, which is quite accurate for the price of about $ 22 in China – it can indicate the level of SMOG for 2.5 and 10 ppm particles. You can also get it at Nettigo – if you don’t want to wait a month for delivery – with the DIY_SMOG_15 coupon code, that’s 15% off the regular price.
- 3 jumper cables
- Charger – any smartphone charger with USB port and USB to microUSB cable. At least 750mA, but it could be more – 1A, 2,1A etc, the ESP8266 board will use only what it needs – in this scenario, together with SDS011 – about 650mA
Software/Tools
- ESPEasy 2.0-dev – ti’s the developing version of the ESPEasy software to be the final 2.0 version, by many programmers. It is the successor of the 1.x. version – at the time of writing, the last version that we can use is dev12, which supports the SDS011 sensor, thanks to its inclusion by Jochen Krapf – who also develops very interesting Nova SDS011 caseings. This version is suitable for daily usage, even if it’s “just” development version.
- Linux – any version that runns the software used to flash ESPEasy into ESP8266. It’s also possible to flash using Microsoft Windows or Mac OS X, but it involves installing the USB-to-serial driver which could be sketchy. Linux has the correct driver in kernel – works without any hassle. The best is a PC with WiFi card and free USB slot, i.e. old cheap netbook (I’m using here very old Acer Aspire One ZG5 with Mint Cinnamon Linux distribution)
Let's do it!
Start your PC with Linux (PC or Raspberry Pi) preferably with Debian based Linux distribution. Insall esptool.py, the software used to flash the ESP8266 with the ESP Easy 2.0 software:
$ sudo apt update
$ sudo apt upgrade
$ sudo apt install python-serial python-pip
$ sudo pip install esptool
If the last command gives you errors, you can try:
$ python -m pip install esptoolCorrect output looks similar to this:
$ pip install esptool
Collecting esptool
  Downloading esptool-2.1.tar.gz (68kB)
    100% |████████████████████████████████| 71kB 1.0MB/s
Collecting ecdsa (from esptool)
  Downloading ecdsa-0.13-py2.py3-none-any.whl (86kB)
    100% |████████████████████████████████| 92kB 1.8MB/s
Collecting pyaes (from esptool)
  Downloading pyaes-1.6.1.tar.gz
Requirement already satisfied: pyserial>;=2.5 in /usr/lib/python2.7/dist-packages (from esptool)
Building wheels for collected packages: esptool, pyaes
  Running setup.py bdist_wheel for esptool ... done
  Stored in directory: /root/.cache/pip/wheels/26/5f/f6/af94c2b40c53d3b78ubeaXXc000272XXd0e1abXXada2a24f1
  Running setup.py bdist_wheel for pyaes ... done
  Stored in directory: /root/.cache/pip/wheels/ca/86/ff/a5a7674159155c92caXXbe7d374XXcfbf3dfeXX386fead1b21
Successfully built esptool pyaes
Installing collected packages: ecdsa, pyaes, esptool
Successfully installed ecdsa-0.13 esptool-2.1 pyaes-1.6.1
Next step – connect your ESP8266 board using the USB to microUSB cable to PC. Please mind if you have any other USB-to-serial adapters, in that case port will be different!
Use dmesg command to verify your board being recognized:
[38450.504000] usb 2-2: new full-speed USB device number 14 using xhci_hcd
[38450.644831] usb 2-2: New USB device found, idVendor=1a86, idProduct=7523
[38450.644834] usb 2-2: New USB device strings: Mfr=0, Product=2, SerialNumber=0
[38450.644836] usb 2-2: Product: USB2.0-Serial
[38451.248808] usbcore: registered new interface driver ch341
[38451.248823] usbserial: USB Serial support registered for ch341-uart
[38451.248838] ch341 2-2:1.0: ch341-uart converter detected
[38451.249237] usb 2-2: ch341-uart converter now attached to ttyUSB0
The chosen ESP8266 based board is now available as ttyUSB0 – /dev/ttyUSB0, given that it’s the only type of that device in your Linux system.
For convenience let’s switch to administrator (root) mode, and create working directory:
$ sudo -i
# mkdir esp_flash
# cd esp_flash
Download from https://github.com/letscontrolit/ESPEasy/releases/ the latest binary version (it’s a ZIP archive) – i.e.: today it’s the dev12 version. Then, uncompress:
# wget https://github.com/letscontrolit/ESPEasy/releases/download/v2.0.0-dev12/ESPEasy_v2.0.0-dev12.zip
# unzip ESPEasy_v2.0.0-dev12.zip
Now all that is lef is to flash onto ESP8266 the correct version, 4MB – dev, (that is the file for 4MB size of flash) – ESPEasy_v2.0.0-dev12_dev_4096.bin:
# esptool.py --chip esp8266 --port /dev/ttyUSB0 --baud 115200 write_flash -fm dio -fs 4MB 0x00000 ESPEasy_v2.0.0-dev12_dev_4096.binCorrect output:
esptool.py v2.1
Connecting....
Chip is ESP8266
Uploading stub...
Running stub...
Stub running...
Configuring flash size...
Compressed 634240 bytes to 414279...
Wrote 634240 bytes (414279 compressed) at 0x00000000 in 36.5 seconds (effective 138.9 kbit/s)...
Hash of data verified.
It’s time for hardware part. Get the SDS011 and disconnect the USB-to-serial that came with it. (thisUSB-to-serial is a popular device, right?). Since ESP8266 has serial port onboard, using the 0 and 3,3V – we don’t need additional adapter. Now hook up 3 jumper cables, please mind the orientation of the plug:
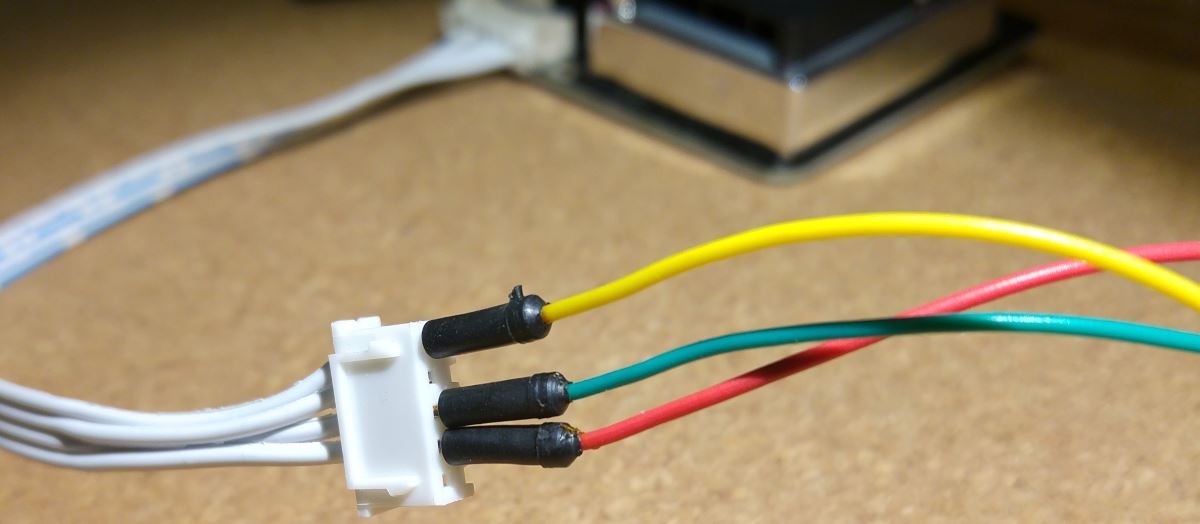
As you can see – we’ve connected (+5V, GND) and TX from the SDS’s serial port. Turn to ESP8266:
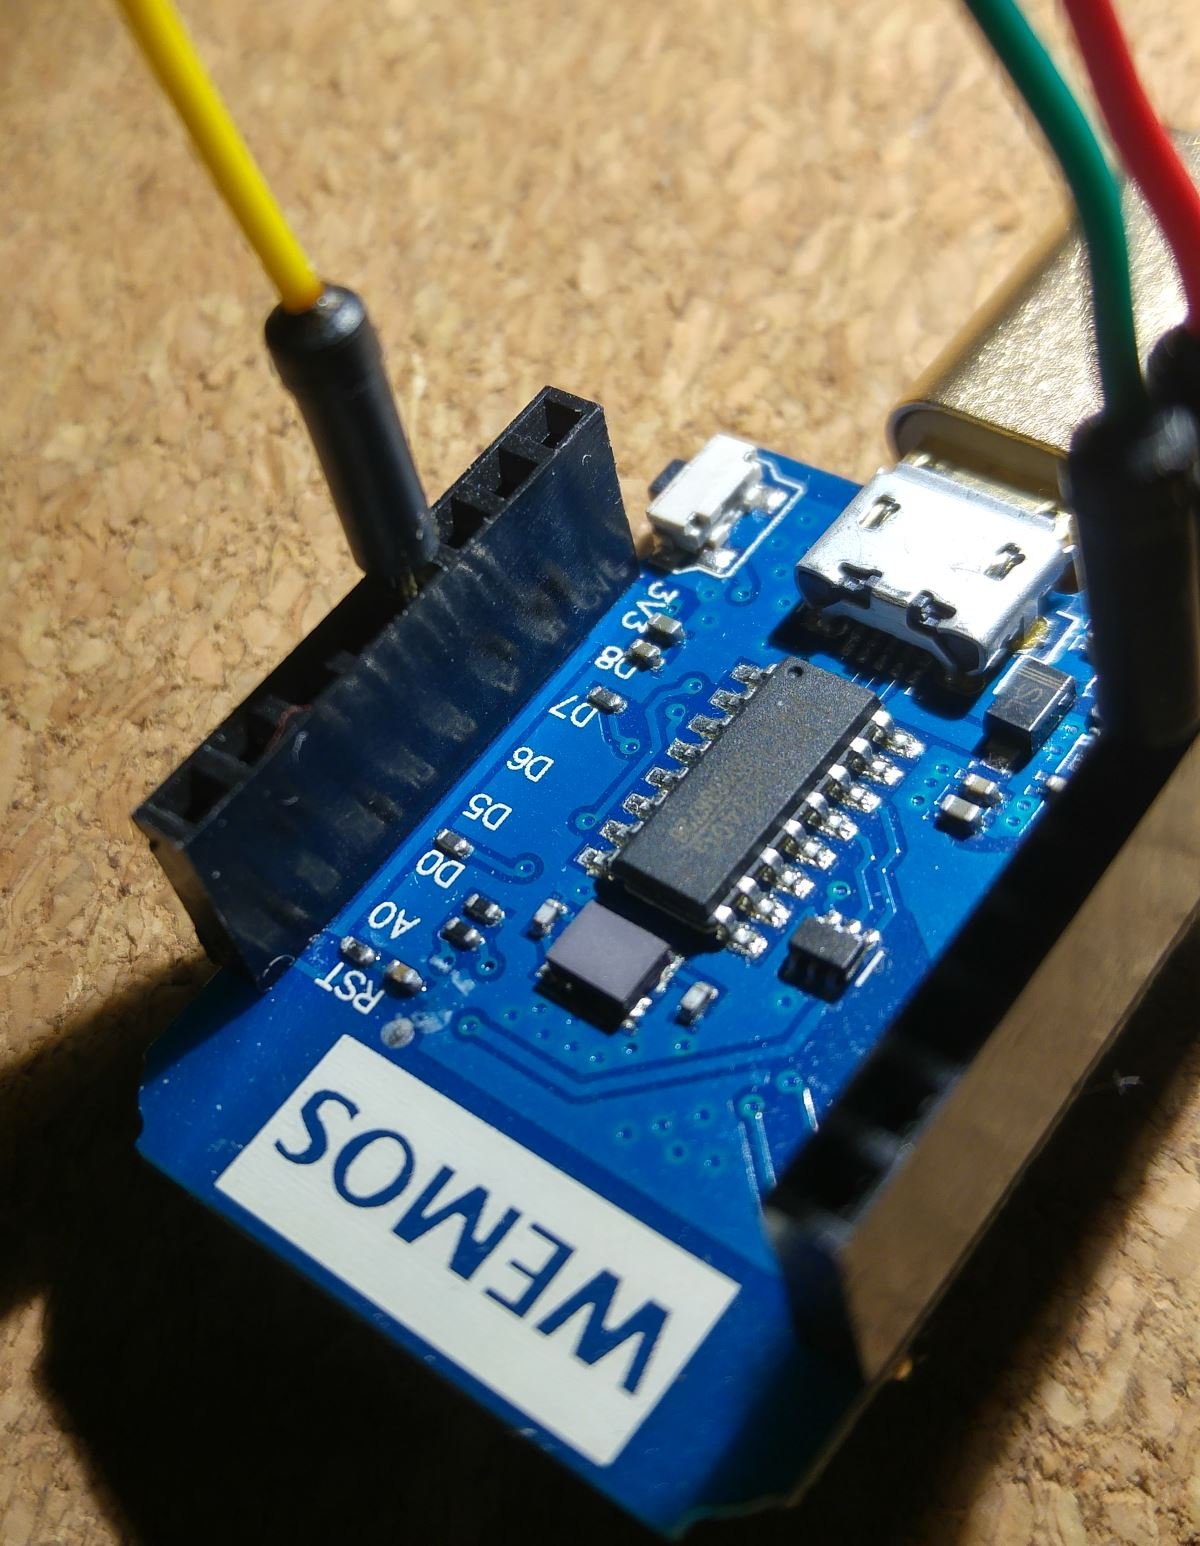
Connect the yellow data TX cable to PIN described as D6. Power goes to +5V and GND:
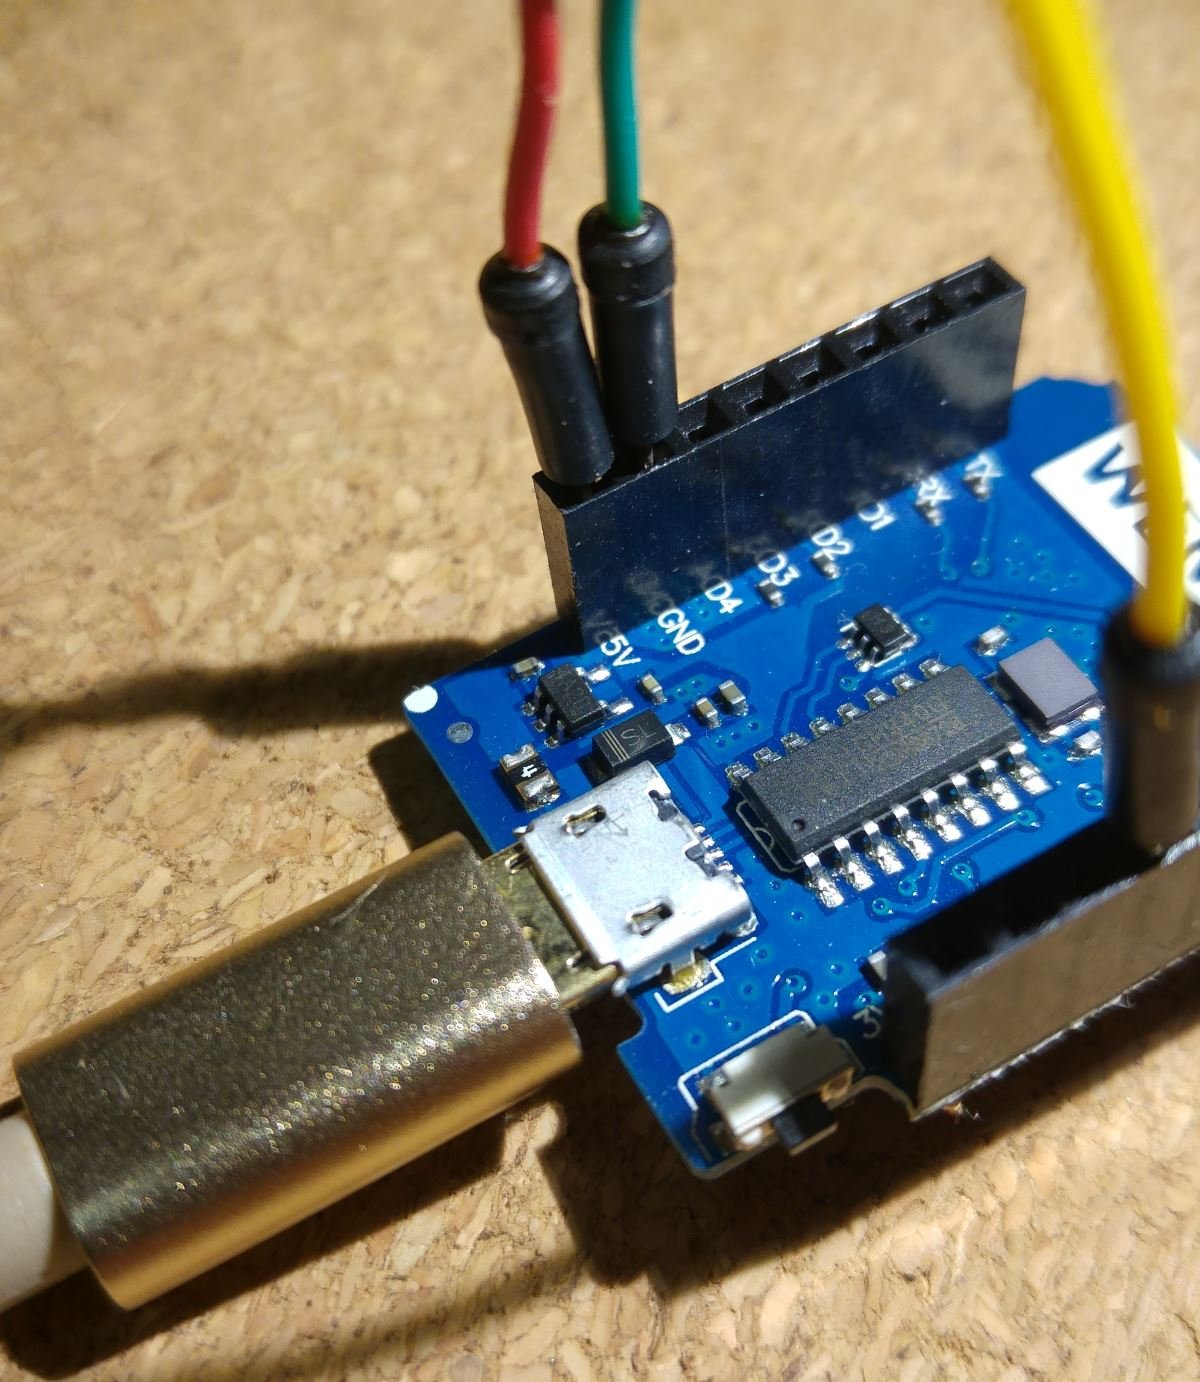
This is the complete projectm time to add power via USB:

After connecting the power the WWW interface of ESPEasy is available via WiFi access point that is started by ESPEasy – with the name (SSID) of ESP_XXXX – and, WPA2 protected setup with default “configesp” password. The “XXXX” is the MAC address of ESP8266, which allows you to tell the many ESP8266 you have!. Connect to the ESP via WiFi, a 192.168.4.x class address should be obtained and use your favourite browser to type in the default address: http://192.168.4.1/
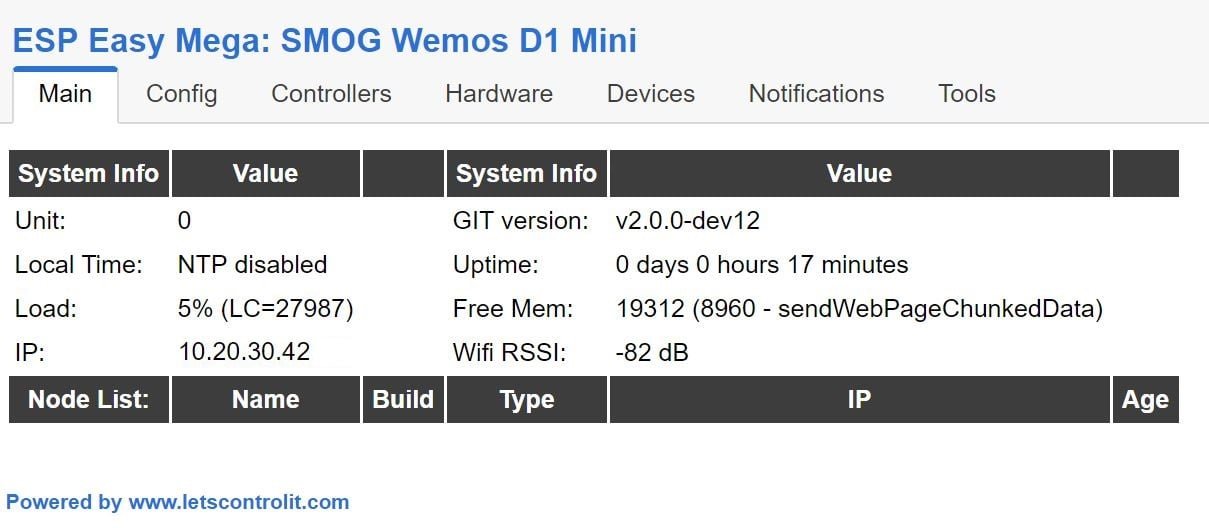
The next step would be to add it to our home WiFi network – the one we usually connect to as it is shown in the Main tab:
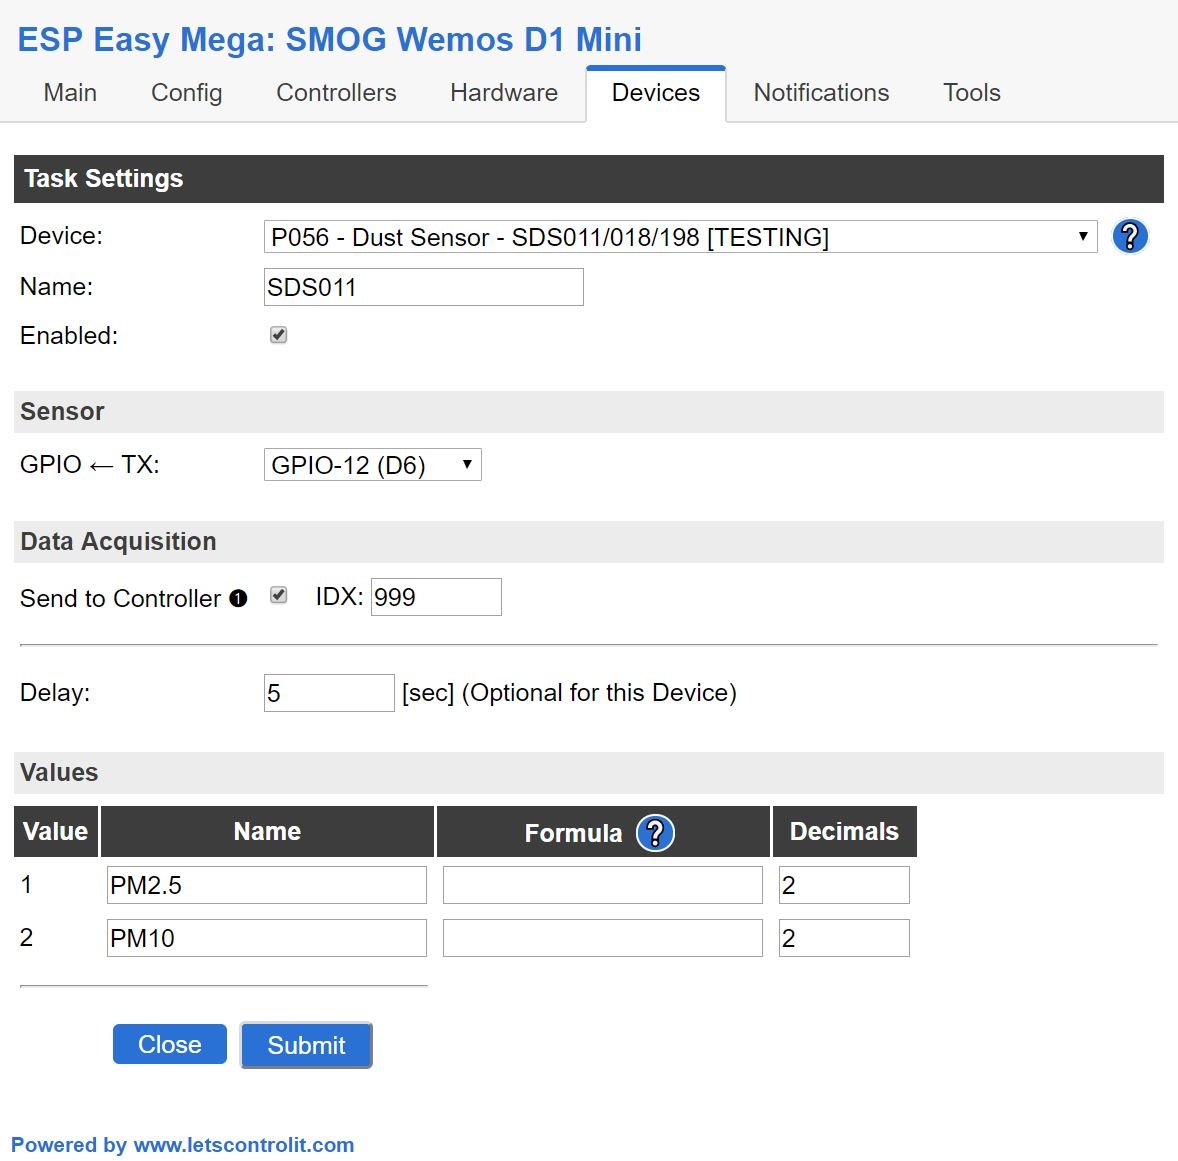
Next – chose the Devices tab and Edit in the first line. Choose from drop down “Device:” menu the SDS011 smog sensor, and fill in the data – using GPIO-12 (D6) to receive data from SDS011 – we won’t be sending anything to it:
Press “Submit” and after around 30 seconds – check the results in Devices tab (refresh the page with F5):

Looks like we have 22,86 μg/m3 of the PM2,5 μm particles and 32,92 μg/m 3 PM10μm.
Caution – do mind that the dust types are named to be properly shown on the ESP8266’s web page. This means that currently we have PM2.5 which is correct, but if you going to build next version of the sensor this variable will be changed to PM25 – without the dot!
That is it, now you can take it with you, just configure the WiFi Hotspot in your smartphone to the same setup as your home WiFi network. Ready for adding OLED screen and another sensor ? Check out the second part.