Raspberry Pi and GSM/2G network - sending sms, connecting to the internet (IoT devices)
This time I’m going to connect to our Raspberry Pi a GSM module. Why? Internet of Things, in short IoT, as it was noted at Krakow’s PLNOG17 by Marcin Aronowski involves and depends on the network which should be easily accessible, and the very essence of IoT is the energy efficiency. Perhaps, he said, 3G will go away but 2G but will still remain. And we do not huge pipes – just enough bandwidth. 2G connection is still the cheapest in the implementation (also due to the cost of the module and a SIM card).
Therefore, I will try to show you how easy it is to connect very cheap GSM module Neoway M590 . It is a simple device that is a GSM modem (2G).
We will learn how to send an SMS and how to connect to the Internet.
What's required?
Software:
- software: picocom, gammu, ppp (accessible via standard Raspbian’s repository)
- turning off the console redirection to serial port on Raspberry Pi
Hardware:
- Raspberry Pi – 1B, 1A, 2B, 3B, Zero – any model with installed Raspbian (mini version is enough)
- Neoway M590 GSM module – preferably without extra letters at the end – get a version with everything soldered and 2×7 pins
- Multimer for voltage and power supply check for GSM module
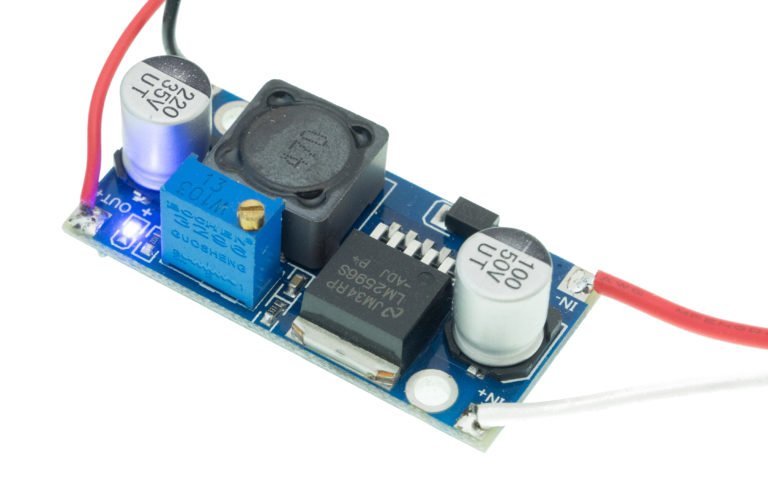
- Optional: DC-DC step down converter – at least rated 2A, usually allows using 5-24V on input and keeping stable 3,9V at output – used to power the GSM module

Let's do it!
We're going to use the Neoway M590 GSM modem module, because it is a bit underestimated – and one of the most important things is to have proper and stable power supply. Module is not as popular as SIM800/SIM900, but – it’s very, very cheap, and after few months of trails on two modules I can say it’s stable.
Please remember, in most cases the correct voltage is 3,7-3,9V, and power rating needs to be minimum 2A.
Connecting to Raspberry Pi
Neoway GSM module has a serial port – this is the standard way to talk – via connections TX, RX. However, the default serial port on Raspberry Pi is occupied by the system console – so if you connect our module to Raspberry’s serial port you will get overflow of text data. Edit the Raspberry Pi file /boot/cmdline.txt and remove the part console=/dev/ttyAMA0,115000. Yo can us it after reboot.
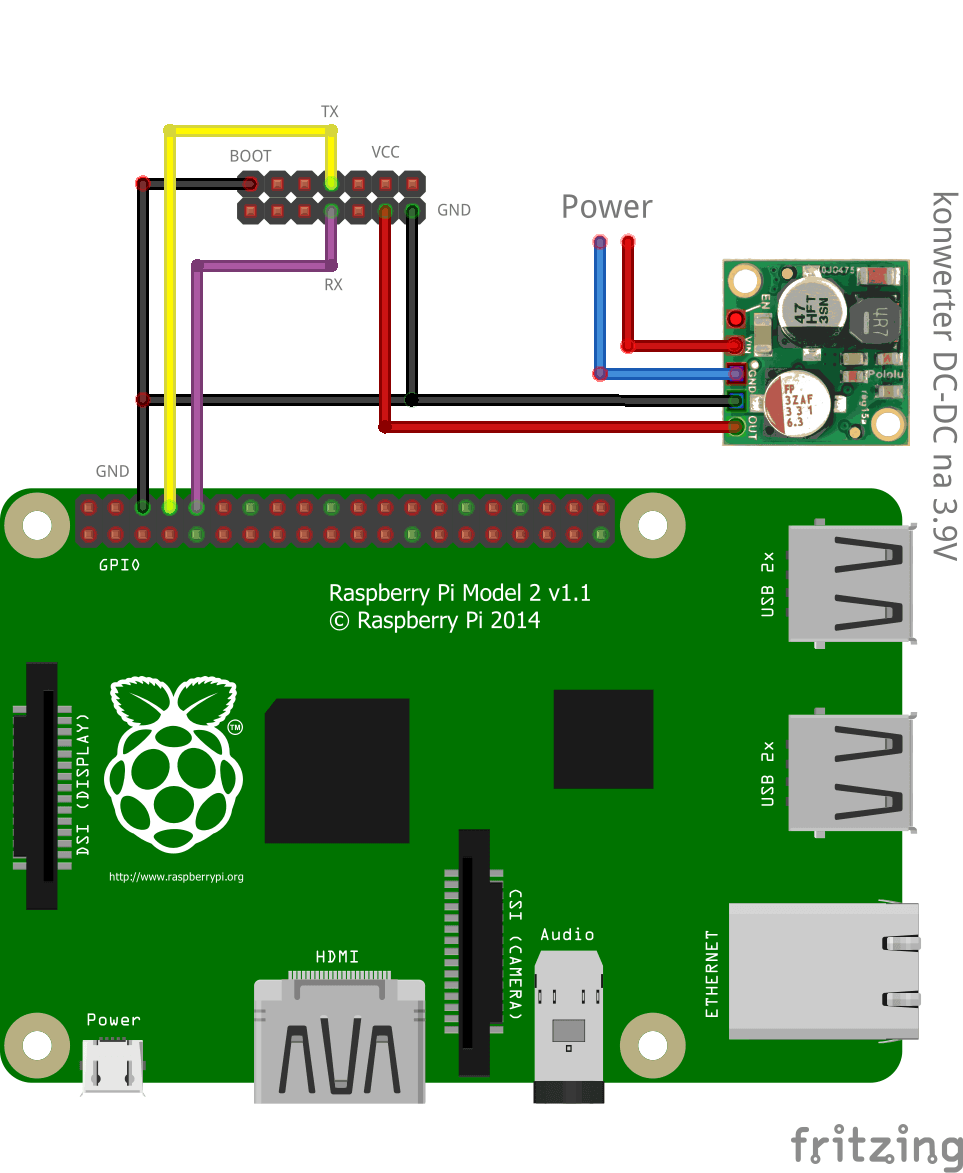
Connect the DC-DC step down power converter – you can also use a battery from an unused smartphone or battery type 18650 – provided that it has a rating of 3.7V – Li Poly or Li Ion battery. If you use are using smilar DC-DC converter as on the picture – with adjustable resistor – use a screwdriver when powered with no load, connect a multimeter and turn as long as the voltage suddenly begin to fall – the set 3,9V. Now connect the GSM module and verify the voltage – sometimes cheap module does not provide stable power supply under load – as a result we have a voltage drop that must be corrected. Do the final adjustment VERY carefully – do not damage the GSM module. Here is the power scheme and the connection to the Raspberry Pi. Diagram shows the version with 2×7 pin connector plates on Neoway M590 facing the SIM card:

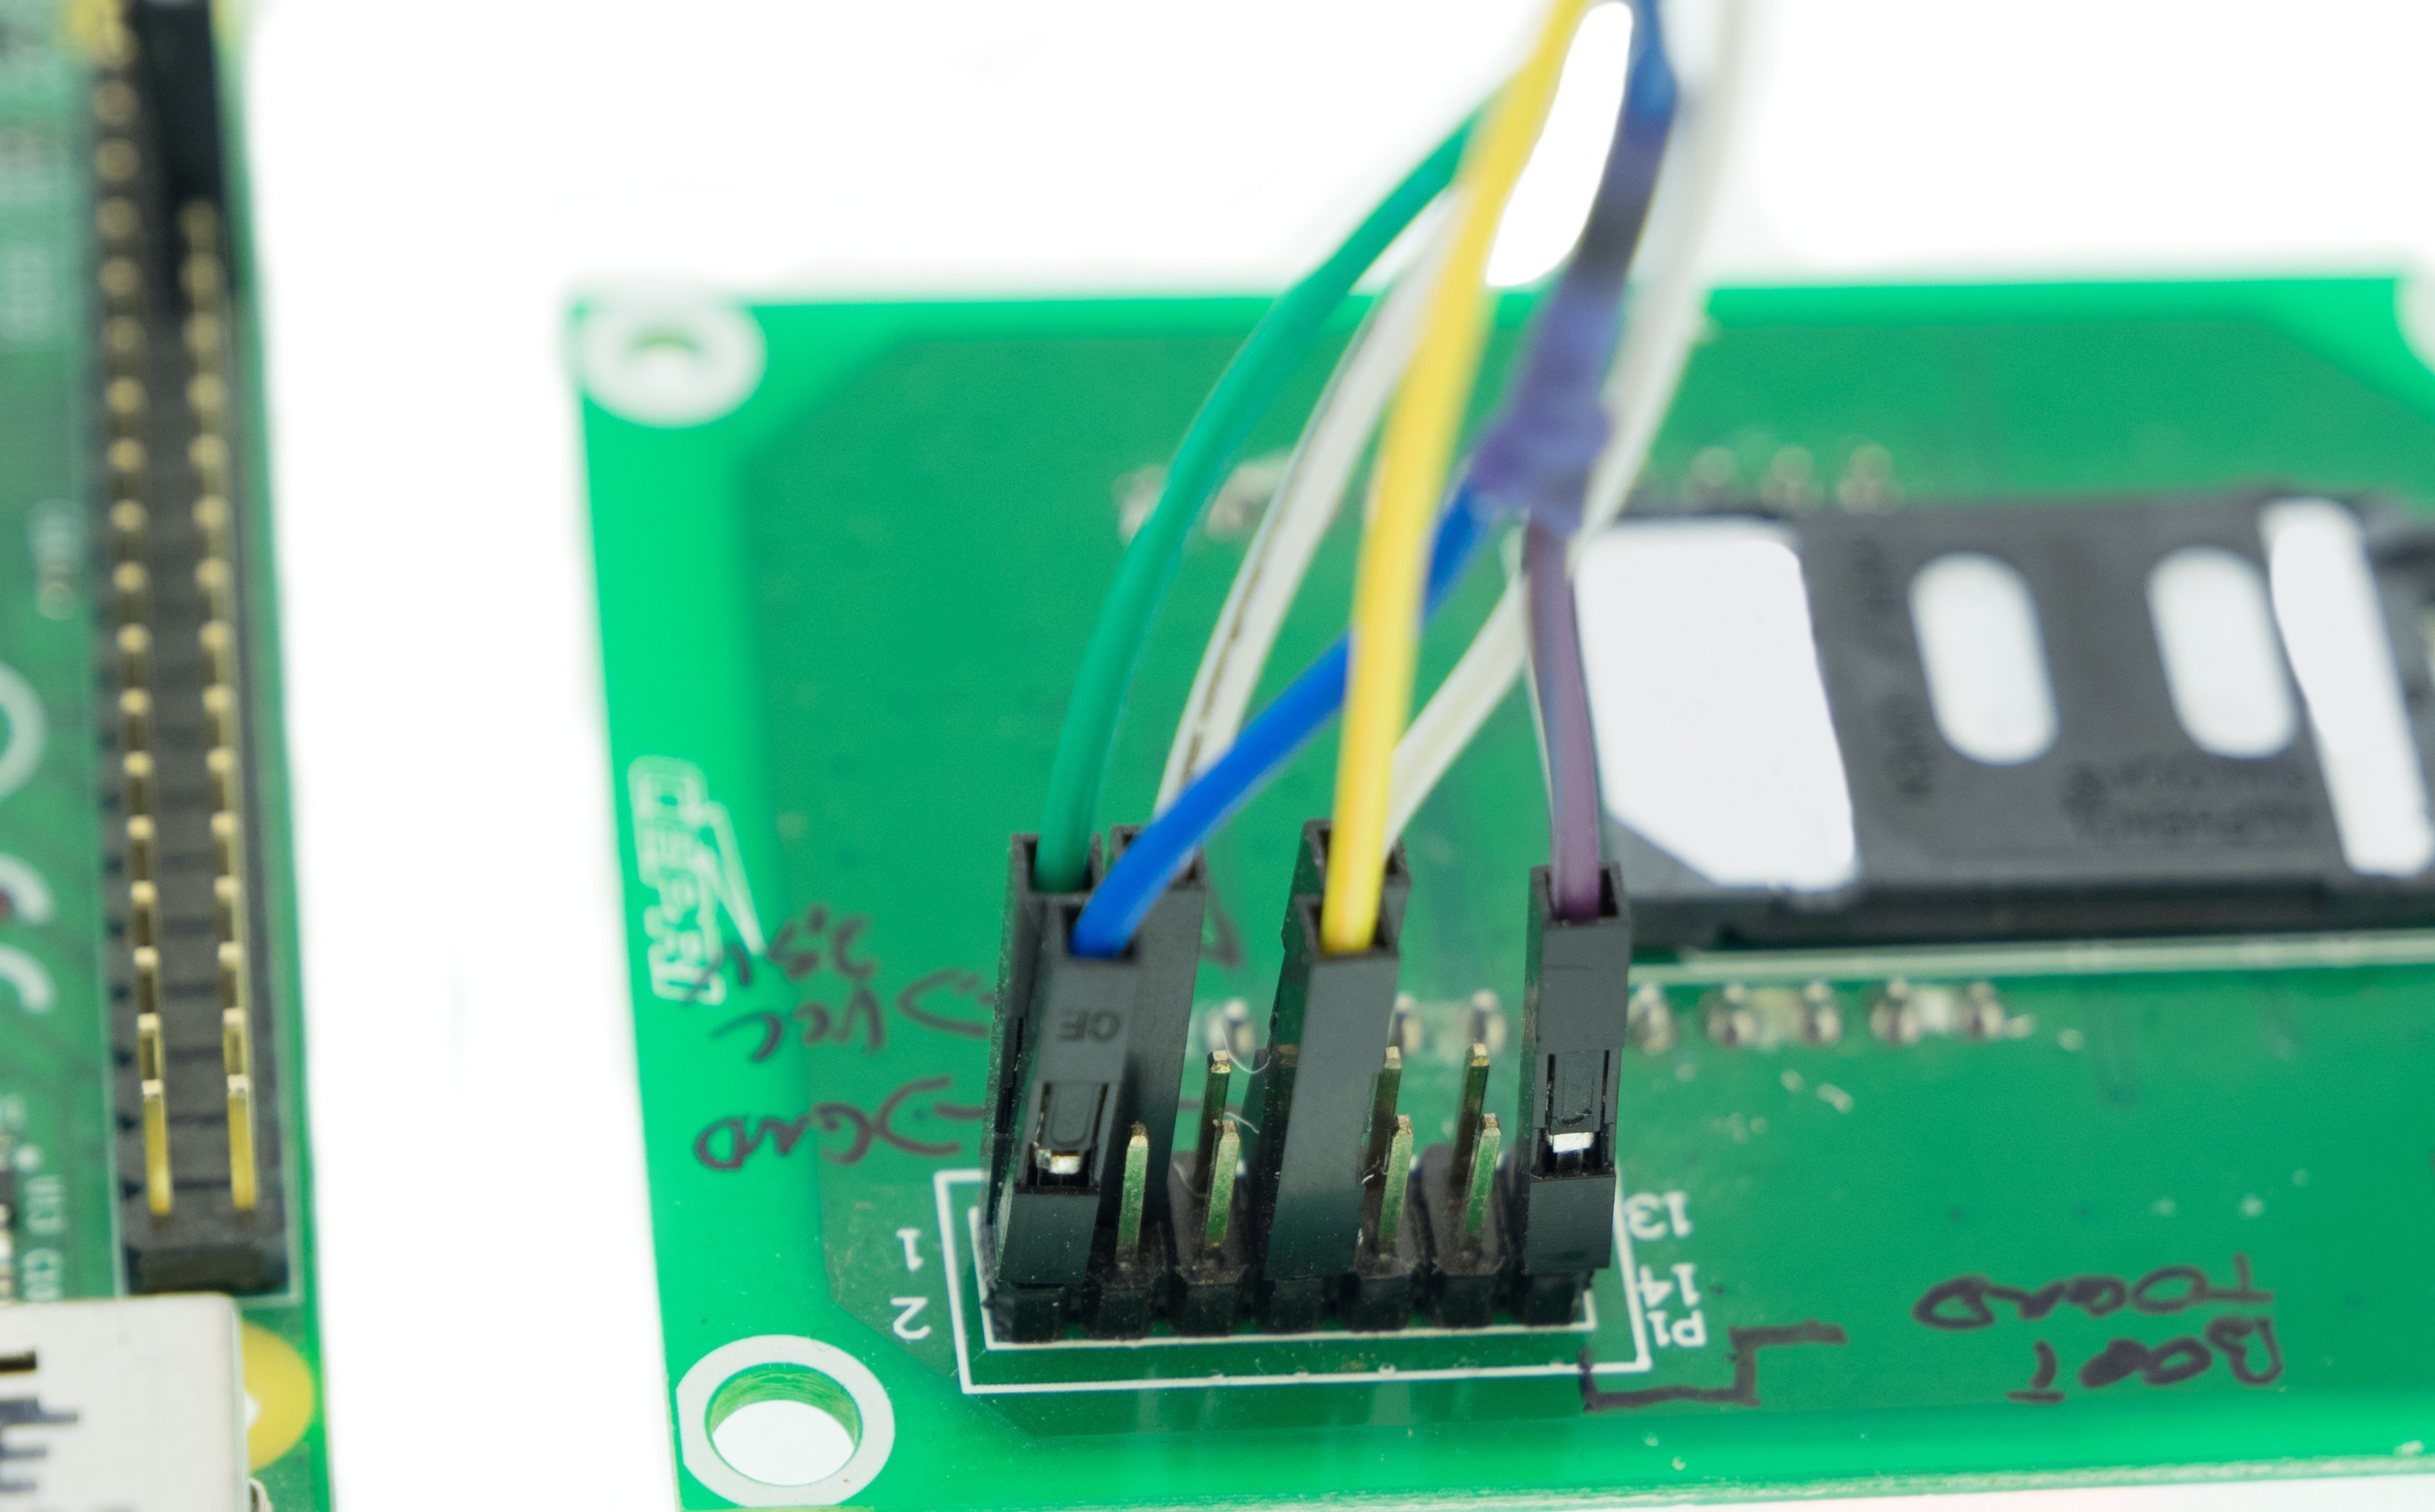
As you can see this is not hard to wire, please remember the GND connections. Neoway M590 needs GND connected to BOOT to start, hence the “extra” connection to the GND of the system. Again the connections from the view of the SIM card slot:

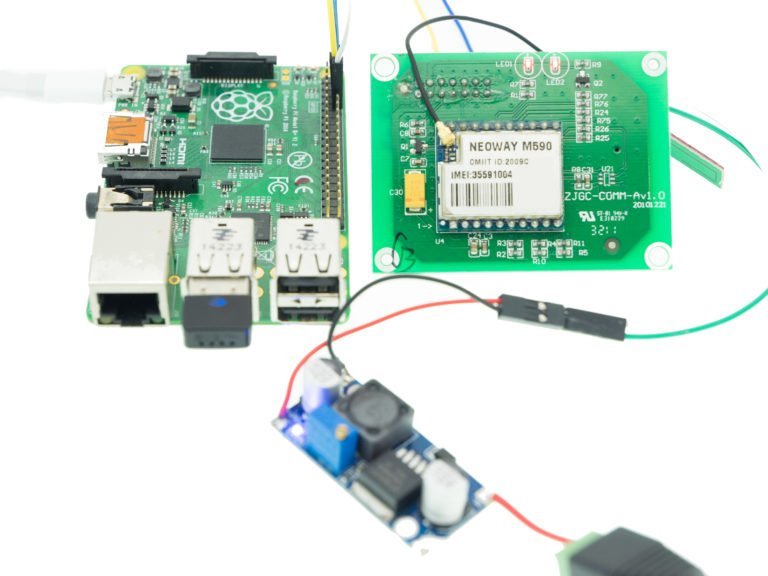
After inserting the SIM card powering the module – the first LED should lit red, and the second should bling to indicate the GSM network connections. Here’s the final view:

Sending first SMS
To get to now the module – you will need to install this:
sudo apt-get install picocomthen issue on the console:
pi@rpi ~ $ picocom --baud 115200 /dev/ttyAMA0
picocom v1.7

port is        : /dev/ttyAMA0
flowcontrol    : none
baudrate is    : 115200
parity is      : none
databits are   : 8
escape is      : C-a
local echo is  : no
noinit is      : no
noreset is     : no
nolock is      : no
send_cmd is    : sz -vv
receive_cmd is : rz -vv
imap is        :
omap is        :
emap is        : crcrlf,delbs,

Terminal ready
AT
OK
You can exit picocom by 'CTR+a' then 'q'.
At the very end, in line 21, I’ve entered the command “AT” and M590 answered “OK”. This means that we have properly (proper TX and RX) connected console. The AT commands with parameters are the natural language of modems – the old “analog” and the new GSM modems. If you’re getting “weird” characters – it’s the bad speed, and if we see what you write – it means that you haven’t deactivated the system console redirection to a serial port yet (in that case – please see above). Let’s see those commands in detail..
picocom --baud 115200 /dev/ttyAMA0
picocom v1.7

port is        : /dev/ttyAMA0
flowcontrol    : none
baudrate is    : 115200
parity is      : none
databits are   : 8
escape is      : C-a
local echo is  : no
noinit is      : no
noreset is     : no
nolock is      : no
send_cmd is    : sz -vv
receive_cmd is : rz -vv
imap is        :
omap is        :
emap is        : crcrlf,delbs,

Terminal ready
AT+CMGF=1
OK
AT+CSMS=1
+CSMS: 1,1,1

OK
AT+CSCS="GSM"
OK
AT+CMGS="601xxx555"
> "To jest TEST SMS"
>
+CMGS: 46

OK
What happened here ? First we setup the modem to send SMS via GSM, then you need to change the “601xxx555” to a proper number for the recipient of the SMS. Next we will get the > sign – this is where you enter your SMS. To send it – press CTRL+Z. After 3-4 seconds you should get: “+CMGS: 46” and “OK’. Check your phone!
To use it with other software and use it wisely – we can use the gammu, that allows single line SMS:
sudo apt-get install gammuLet’s send the first SMS, first by picocom, and later “automatically” via gammu:
sudo pico /etc/gammurcThen edit the gammu’s config:
[gammu]
device = /dev/ttyAMA0
connection = at115200
And now send your SMS like that:
gammu sendsms TEXT 601xxx555 -text "To jest TEST SMS"Easy, huh? ;)
Connecting to the Internet
Our module enables data transmission in GPRS mode. Combining that with the fact that we are @ 115kbps serial link, allows us to use the GPRS. Don’t forget – this is suited the task of running IoT solution, and not to use the browser in graphics mode (yet lynx, links or elinks do work without problem)
Let’s install the program to connect to the Internet. The ‘ppp’ will negotiate connection using a GSM modem, set ppp0 and append DNS entries, as well as the default route:
sudo apt-get install pppCreate a file:
sudo pico /etc/ppp/peers/m590-gsm-internetwith:
# Script that allows connecting to internet via GPRS
connect "/usr/sbin/chat -v -f /etc/chatscripts/gprs -T internet"
# The serial port that we will use
/dev/ttyAMA0
# Port speed
115200
# The IP is set by  ISP
noipdefault
# So are DNS IPs
usepeerdns
# This will say that we should use this link as our default route to Internet
defaultroute
# Nakazuje pppd "dzwonić" a więc łączyć się, jak połączenie z jakiego powodu stracimy
persist
# We don't need auth
noauth
# Nor ...
nocrtscts
# line control or check
local
Checkout the gprs file from chatscripts – it should be exactly like this:
# You can use this script unmodified to connect to cellular networks.
# The APN is specified in the peers file as the argument of the -T command
# line option of chat(8).

# For details about the AT commands involved please consult the relevant
# standard: 3GPP TS 27.007 - AT command set for User Equipment (UE).
# (http://www.3gpp.org/ftp/Specs/html-info/27007.htm)

ABORT           BUSY
ABORT           VOICE
ABORT           "NO CARRIER"
ABORT           "NO DIALTONE"
ABORT           "NO DIAL TONE"
ABORT           "NO ANSWER"
ABORT           "DELAYED"
ABORT           "ERROR"

# cease if the modem is not attached to the network yet
ABORT           "+CGATT: 0"

""              AT
TIMEOUT         12
OK              ATH
OK              ATE1

# +CPIN provides the SIM card PIN
#OK             "AT+CPIN=1234"

# +CFUN may allow to configure the handset to limit operations to
# GPRS/EDGE/UMTS/etc to save power, but the arguments are not standard
# except for 1 which means "full functionality".
#OK             AT+CFUN=1

OK              AT+CGDCONT=1,"IP","\T","",0,0
OK              ATD*99#
TIMEOUT         22
CONNECT         ""
That’s it. Connect to the internet using:
sudo pon m590-gsm-internetCheck the logs in separate console (i.e.: tail -f /var/log/syslog)
Oct  8 23:23:13 rpi pppd[17390]: Connect: ppp0  /dev/ttyAMA0
Oct  8 23:23:13 rpi ifplugd(ppp0)[17403]: ifplugd 0.28 initializing.
Oct  8 23:23:13 rpi ifplugd(ppp0)[17403]: Using interface ppp0/00:00:00:00:00:00
Oct  8 23:23:13 rpi ifplugd(ppp0)[17403]: Using detection mode: IFF_RUNNING
Oct  8 23:23:13 rpi ifplugd(ppp0)[17403]: Initialization complete, link beat detected.
Oct  8 23:23:14 rpi ifplugd(ppp0)[17403]: Executing '/etc/ifplugd/ifplugd.action ppp0 up'.
Oct  8 23:23:14 rpi ifplugd(ppp0)[17403]: client: Ignoring unknown interface ppp0=ppp0.
Oct  8 23:23:14 rpi ifplugd(ppp0)[17403]: Program executed successfully.
Oct  8 23:23:14 rpi kernel: [701282.272157] PPP BSD Compression module registered
Oct  8 23:23:14 rpi kernel: [701282.284205] PPP Deflate Compression module registered
Oct  8 23:23:16 rpi pppd[17390]: local  IP address 10.75.12.27
Oct  8 23:23:16 rpi pppd[17390]: remote IP address 10.75.12.27
Oct  8 23:23:16 rpi pppd[17390]: primary   DNS address 89.108.202.21
Oct  8 23:23:16 rpi pppd[17390]: secondary DNS address 89.108.195.21
Oct  8 23:23:17 rpi ntpd[779]: Listen normally on 11 ppp0 10.75.52.17 UDP 123
Oct  8 23:23:17 rpi ntpd[779]: peers refreshed
Oct  8 23:23:18 rpi dnsmasq[6117]: czytanie /var/run/dnsmasq/resolv.conf
Oct  8 23:23:18 rpi dnsmasq[6117]: używam adresów lokalnych tylko dla domeny dom
Oct  8 23:23:18 rpi dnsmasq[6117]: używam serwera nazw 8.8.4.4#53
Oct  8 23:23:18 rpi dnsmasq[6117]: używam serwera nazw 8.8.8.8#53
Oct  8 23:23:18 rpi dnsmasq[6117]: używam serwera nazw 89.108.202.21#53
Oct  8 23:23:18 rpi dnsmasq[6117]: używam serwera nazw 89.108.195.21#53
It works!
Check the ifconfig (or ip a s) output:
ppp0      Link encap:Point-to-Point Protocol
          inet addr:10.75.12.27  P-t-P:10.75.12.27  Mask:255.255.255.255
          UP POINTOPOINT RUNNING NOARP MULTICAST  MTU:1500  Metric:1
          RX packets:8 errors:0 dropped:0 overruns:0 frame:0
          TX packets:9 errors:0 dropped:0 overruns:0 carrier:0
          collisions:0 txqueuelen:3
          RX bytes:116 (116.0 B)  TX bytes:191 (191.0 B)
Turning off is also easy:
sudo poff m590-gsm-internetLogs will show you the process:
Oct  8 23:26:40 rpi avahi-daemon[539]: Withdrawing workstation service for ppp0.
Oct  8 23:26:41 rpi ntpd[779]: Deleting interface #11 ppp0, 10.75.12.37#123, interface stats: received=0, sent=0, dropped=0, active_time=204  secs
Oct  8 23:26:41 rpi ntpd[779]: peers refreshed
That’s it – please remember that data plan can be costly. Check your data plan!

This work is licensed under a Creative Commons Attribution-NonCommercial-NoDerivatives 4.0 International License (c) 2014-2024 Łukasz C. Jokiel, [CC BY-NC-SA 4.0 DEED](https://creativecommons.org/licenses/by-nc-sa/4.0/)