Update 2017-08-22 – Sharing data with friendly radars
A lot has changed since the last entry about tracking the aircraft using ADS-B messages. There are new options for data sharing, greatly simplified installation procedure and – optionally new equipment. This allows you to build a new receiver with an emphasis on simplicity, yet lower cost of purchase and maintenance with new feature (MLAT). Moreover, in addition to the aircraft you can now track other aircraft – i.e. meteorological balloons! I call that progress!

What will you need?
Hardware:
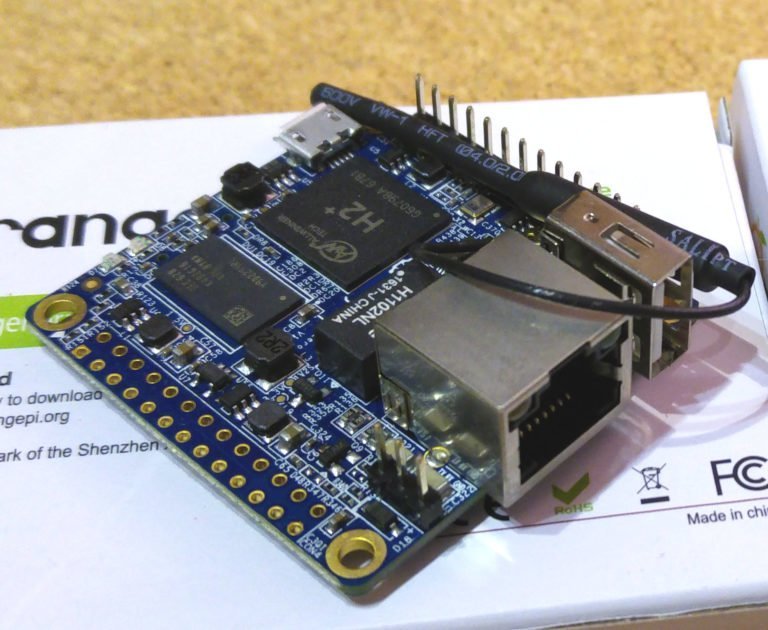
- Orange Pi Zero. It’s another SBC - that was created as competition for Raspberry Pi – board that gives a lot for $10 – four CPU cores, 256 or 512MB RAM. Onboard you will find Ethernet and WiFi along with single USB. There’are extension available – extra USB/IR/CVSB Out HAT or new USB2SATA HAT
- DVB-T USB Dongle. Look for the upgraded version in blue chassis – AKA “DVB-T RTL2832U+R820T2” – it offeres better sensitivity in interesting frequency – and will give you extra range. The most important part in that equation is the new R820T2 (version ‘2’) and of course the included antenna
- Micro SD – could a cheap 8G for $4, but better is to use Sandisk Extreme/Ultra – at least 4GB
- Power supply – at least1.5 to 2A @5V with micro USB (i.e.: old charger from cellphone)
- Two small heatsinks (radiators) for CPU and controller – for Orange Pi Zero
- ALTERNATIVE: Raspberry Pi 2 or 3 – they have enough of CPU power, but triple the price
-
In summary: Our new reciever should be around 25-30$ in total!

Software:
- Armbian for Orange Pi – the best at this point is to use the Ubuntu Xenial with legacy kernel, you can also try developer/beta version, with 4.9.x kernel. Go to https://www.armbian.com/orange-pi-zero/
- piaware and fr24feed – software to recieve, decode and share the data about plane flyovers. Free ports on the Orange Pi – 8080 and 3000-30010 – if there’s nothing else there – they should be free to use.
MLAT – new function
MLAT is short for multilateration. Airships without ADS-B transponders do not advertise their latitude and longitude, so the Mode S they use is not useful for us. Thankfully those Mode S transponder messages can be used by means of multilateration – based on the delay of the received messages in at least 3 different receiving Mode S. A very precise clock synchronization is required – which means you have another oportunity to ask friends living so-so close by to start their own radars!

Orange Pi Zero
As you noticed – we have been using mainly Raspberry Pi. The unprecedented success of this small computer spurred a number of “compatible” boards – Orange Pi Zero is very cheap, able, but the software is not yet quite there or stable. Well, it’s whatever $10 can buy!
Antena
Start with the included antenna. Next use google to find out the optimal length – and cut it. From there to increase coverage – you will ned to dive into the wonderful world of pro antennas!
The roof top is the best place for antenna, but don’t forget that if you place your Orange Pi in the attic – it may get very hot!
Installation
Before first run of the Orange Pi Zero – please install the heatsink on the H2+ CPU, and on the chip next to it. With the heatsinks and no chassis the CPU works at 42-48C. Without it 60-65C – which can shorten the life of both Orange Pi and the micro SD card.
Let’s install – just as in the first blog entry about SDR – Armbian with 4.9.x (Xenial) – using dd or win32diskimager.
On the first run Armbian allows you to login as root with the password “1234”, and immediately asks to change this default password, and create a user. Could be ‘pi’ user of course.
Let’s login now as pi and change the credentials to root:
sudo su -Now – every commend we issue we do it as root, so be careful!
First: update and upgrade of the armbian system:
apt update && apt upgradeTo allow usage of the raw feed from airplanes we need to turn off the automatic loading of the DVB-T:
nano /etc/modprobe.d/rtl-sdr-blacklist.confand paste:
blacklist dvb_usb_rtl28xxu
blacklist e4000
blacklist rtl2832
blacklist r820t
blacklist rtl2830
blacklist dvb_usb_rtl28xxu
blacklist dvb_usb_rtl2832u
Next comes the Flightaware – Pi Aware software – first part of our radar:
wget http://flightaware.com/adsb/piaware/files/packages/pool/piaware/p/piaware-support/piaware-repository_3.1.0_all.debInstall it:
dpkg -i piaware-repository_3.1.0_all.deb
apt update
apt install piaware
apt install dump1090-fa
Add auto upgrade of the piaware itself:
piaware-config allow-auto-updates yes
piaware-config allow-auto-updates yes
Now let’s turn to Flightradar24:
sudo bash -c "$(wget -O - http://repo.feed.flightradar24.com/install_fr24_rpi.sh)"As with the first blog entry – please enter your data, key. postion of the antena.
Let’s connect FR24 with Pi Aware:
nano /etc/fr24feed.iniand paste:
receiver="avr-tcp"
fr24key="TwojKluczFR24"
path="/usr/bin/dump1090-fa"
bs="yes"
raw="yes"
logmode="2"
mlat="yes"
mlat-without-gps="yes"
Enable’em all!:
systemctl enable piaware
systemctl enable fr24feed
Now - let's reboot to check if it's all OK
rebootAfter reboot – check out your new map!
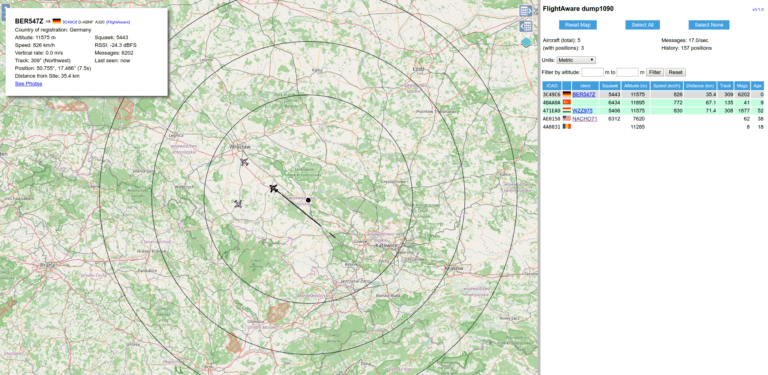
http://adres_ip_Waszego_orange_pi:8080/Example map:

Go ahead and check this US military airplane… Nice example why MLAT is usefull! Couple of minutes later I found out circling… AWACS
Status “fr24feed” i “piaware” can be seen here:
tail -f /var/log/fr24feed.log /var/log/piaware.logor:
piaware-statusThat is it!
Sharing data with friends
Together we are strong! There’s always someone who has resources, server and is able to recieve multiple radar data and present them on web. Usually, by sharing you will get the access to such service, also to the data that is based on MLAT. How to connect? You should get the IP address and port (socket) from the server provider to connect to – all you need to do is one line to redirect (copy actually) the traffic and data from your radar.
First let’s install socat
apt-get install socatNow – test the connection:
/usr/bin/socat -d -T 90 TCP4:localhost:30005 TCP4:ADRES_IP_RADARU_ZNAJOMEGO:PORT_PODANY_PRZEZ_ZNAJOMEGOIf that works fine – break the operation using CRL+C and set-up the permanent connection via crontab:
crontab -eadd line:
*/20 * * * * /root/bin/share_flight_data.bashNow crate the file/root/bin/share_flight_data.bash:
mkdir -p /root/bin
touch /root/bin/share_flight_data.bash
chmod 755 /root/bin/share_flight_data.bash
pico /root/bin/share_flight_data.bash
Put in the file:
#!/bin/bash
if [ `/usr/bin/pgrep -f "feed_do_znajomego_30005" | /usr/bin/tr '\n' ' '| /usr/bin/awk '{print $1}'` ]; then echo "feed_do_znajomego dziala"; else /usr/bin/screen -dmS feed_do_znajomego_30005 /usr/bin/socat -d -T 90 TCP4:localhost:30005 TCP4:ADRES_IP_RADARU_ZNAJOMEGO:PORT_PODANY_PRZEZ_ZNAJOMEGO; echo "Uruchamiam feed_do_znajomego_30005"; fi >> /tmp/share_data.log 2>&1
That’s it – every 20 minutes the system will check if the feed works.

This work is licensed under a Creative Commons Attribution-NonCommercial-NoDerivatives 4.0 International License (c) 2014-2024 Łukasz C. Jokiel, [CC BY-NC-SA 4.0 DEED](https://creativecommons.org/licenses/by-nc-sa/4.0/)