SDR using Raspberry Pi – traking airplanes above our heads using ADS-B data
Note: There’s a newer version of this entry – updated with latest tests, much easier to install: https://blog.jokielowie.com/en/2017/01/sledzimy-samoloty-cz-2-ads-b-i-mlat-najtanszy-odbiornik-dla-flightaware-oraz-flightradar-24
Last time I’ve shared with you the Raspberry Pi “computer for a buck”. Unless you’re are learning Python or playing Minecraft – or better – you’re already bored – I have a new thing fro you. It’s a very nice idea that you can use as your graduation or school project – and it’s all about tracking airplanes high in the sky. From hardware point – you will need a DVB-T/DAB USB dongle – quite easy to obtain and also – quite cheap. We will be aiming to build a very cheap platform to send data back to Flight Radar 24 (and for us too), which gives us premium access and increases coverage of this particular service. So what’s it all about ?
![]()
- spotting – it’s basically taking photos of the airplanes (regular airlines) that are travelling at RNAV. To take a photo – you need to know exactly when they are gonna fly-by and you need to know who’s flying – where to, where from etc.
- receiving radio signal – we need to receive a specially modulated signal that airplanes are sending and interpret it – I’ll get back to this
- drawing on the map the up to date position of the airplane and sharing this over local network
- you can also try to listen to classic FM radio
- as well as CB, TAXI corporations chatter
- tracking amateur baloons that go up high into stratosphere
- if you live near the airport you can also listen to chatter just like LiveATC.net does
- basically listening to any radio from 50MHz to 2GHz, and demodulating digital signals
- feeding FlightRadar24 with data and getting premium access
So it’s a lot like HAM Radio, but you don’t need any license – because we’re just listening. Before Internet age, HAM radio was very popular, then got a bit forgotten. Today we have resurection – a lot of interest, because of the cheap electronics. Don’t forget – we’re not TRANSMITTING – just listening, we don’t need LICENSE and we don’t need to build exciters. But what do we need – some expensive equipment ? No! Thanks to great work on drivers for USB dongles with Realtek chipset (DVB-T, DAB or FM) by Antti Palosaari, he discovered that they can be configured to pass-through any raw radio data – not demodulated – leaving this to the software. Hence SDR – Software Defined Radio.
What will you need:
- any PC with Windows or Linux (preferably RaspberryPi/Linux any vesion, since it’s very low on power – can run anytime)
- USB DVB-T dongle– tuner USB to receive DVB-T/DAB(+). There’re many combination those with Eltronics 4000 (E4000) tuner seem to be the best to our project. But it’s always the RTL2832U chip that is need. So take this tuner+chipset combination in mind.
- OPTION: piece of copper wire to get better reception of our data – a better antenna
Let's build it

The DVB-T dongle is easy accessible – Ebay, brick and mortar shops, just take caution on the tuner. First: let’s make sure that our Raspberry Pi works with Rasbian using kernel version of at least 3.6.11+. Check by issuing:
root@raspberrypi:~# uname -aWe should get this or better (4.x.yz is also fine – just above 3.6.11+):
Linux raspberrypi 3.6.11+ #385 PREEMPT Fri Mar 1 21:53:22 GMT 2013 armv6l GNU/Linux.If not – update your kernel using the following command:
root@raspberrypi:~# rpi-updateAfter reboot we should again check if our Pi has the latest kernel running.
Now that means that there's a good chance that our dongle will be properly recognized. Attach the antenna that comes with the dongle and try to position it near window (it’s magnetic). The standard antenna could give us coverage of anything between 50 up to 80km. Airplanes use the 1090MHz frequency for ADS-B, and it’s attenuated by clouds so if it’s raining – expect 30-40km range. Such antenna is good for a start, but it’s a good idea to ask for help – a fellow HAM radio operator will help you to build an antenna for up to 200km coverage. He will speak of things like Ohms and impendance.
Insert the USB dongle – and enter:
root@raspberrypi:~# dmesg | grep RTLWhich should give us the confirmation of the chipset running:
[ 3.452787] usb 1-1.3: Product: RTL2838UHIDIR.Let’s start to install software – first some libraries to build software to decode ADS-B messages:
apt-get install cmake build-essential git libusb-1.0-0-dev pkg-configNext we need to build the application called rtl-sdr from sources using git. No worries it’s just like using other Linux distros: Gentoo, Ubuntu czy ArchLinux. For our Raspbian we enter those commands:
sudo su -
git clone git://git.osmocom.org/rtl-sdr.git
mkdir rtl-sdr/build
cd rtl-sdr/build
cmake ../
make
make install
ldconfig
This will pull necessary files and start build (complilng, linking etc.) If this fails – name your error in comments. Let’s test our rtl_sdr library (this will most likely fail but read along):
pi@raspberrypi ~ $ rtl_test

Found 1 device(s):
0: ezcap USB 2.0 DVB-T/DAB/FM dongle
Using device 0: ezcap USB 2.0 DVB-T/DAB/FM dongle
Found Rafael Micro R820T tuner
Supported gain values (29): 0.0 0.9 1.4 2.7 3.7 7.7 8.7 12.5 14.4 15.7 16.6 19.7 20.7 22.9 25.4 28.0 29.7 32.8 33.8 36.4 37.2 38.6 40.2 42.1 43.4 43.9 44.5 48.0 49.6
Reading samples in async mode...
Great! But in case it fails – which is common nowadays - since most of the kernels in Pis will properly recognize the DVB-T as it supposed to be: DVB-T dongle reciever and NOT a SDR device as we want it – we need to tell Pi to communicate in our RAW SDR mode with the dongle. All out need to do is to create the file:
/etc/modprobe.d/rtl_sdr-blacklist.confwhich will tell Pi that it’s not supposed to load drivers (called kernel modules) when this donlge is inserted or found in USB slot:
blacklist dvb_usb_rtl28xxu
blacklist rtl2832
blacklist rtl2830
Please reboot your Pi. If it works well now we can build another needed program – this time to interpret the messages: dump1090:
git clone git://github.com/antirez/dump1090.git
cd dump1090
make
That’s it! Next enter:
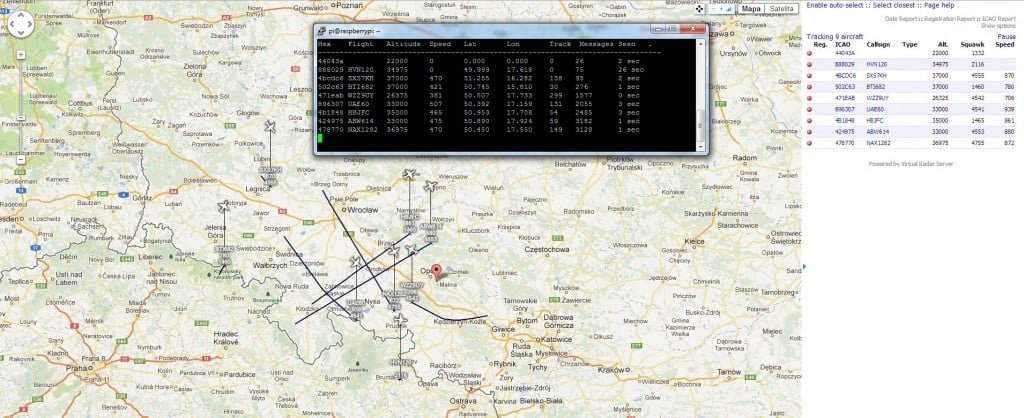
./dump1090 --interactive --netwhich should give you simliar data – given we have planes in range and correctly installed antenna:
Hex    Flight   Altitude  Speed   Lat       Lon       Track  Messages Seen .
--------------------------------------------------------------------------------
47340d WZZ106   37000     458     50.794    16.537    103   184       0 sec
3c56ab CLS203   38025     449     49.975    17.407    274   303       2 sec
47340e WZZ52N   36000     446     50.651    17.662    340   1064      0 sec
Yeah it works just using this little antenna! But how to display that in some fancy way ? Let’s choose a very nice and well maintained VirtualRadar, which works using .NET 3.5 in Windows or with mono on Linux
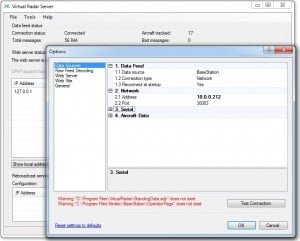
After instalaltion we should change the protocol to BaseStation, and in network options we set our IP address of Raspberry Pi running dum1090 (here it’s 10.0.0.212), with default port of 30003.
VirtualRadar shows the data using Google Maps and local webpage, so start your fav browser and enter: http://127.0.0.1:8080/VirtualRadar/GoogleMap.htm


How to get Flight Radar Premium account
Let’s share the data for fun and profit! Download always updated fr24feed_arm-le_225s and register on Flight Radar 24 webpage to get the key. Type it as HERETYPETHEKEY:
#export FR24AUTHIP=83.140.247.20
fr24feed_arm-le_225s --fr24key=HERETYPETHEKEY
If it’s correctly connecting – it will look like this:
[i]sent 1 planes in 1 packets
[n]pinging the server
[i]sent 1 planes in 1 packets
[i]sent 1 planes in 1 packets
[i]sent 1 planes in 1 packets
[i]sent 1 planes in 1 packets
[i]sent 1 planes in 1 packets
[i]sent 1 planes in 1 packets
[i]sent 1 planes in 1 packets
[i]sent 1 planes in 1 packets
[i]sent 1 planes in 1 packets
[i]sent 1 planes in 1 packets
And after a short while you will get your premium access – confirm you’re feedeing the data. dump1090 works now both for our VirtualRadar and simultaneously for Flight Radar 24
Auto start at boot
Our software should be able to run during startup, and we should monitor if they are working, so let’s start by installing the screen program
sudo apt-get install screenThen we will tell Pi to periodically check if our software is running – using the system scheduler – cron, while we can see how they are doing by using screen:
On the console:
crontab -etype in the editor, and replace the values in caps:
#FR24AUTHIP=83.140.247.20
*/1 * * * * if [ `/bin/ps a | /bin/grep dump1090 | /bin/grep -v grep | wc -l` -gt 0 ]; then echo "dump1090 dziala"; else screen -dmS dump1090 dump1090 --interactive --net --interactive-rows 5; fi > /home/pi/dump1090.log 2>&1
*/1 * * * * if [ `/bin/ps a | /bin/grep fr24feed_arm-le_233 | /bin/grep -v grep | wc -l` -gt 0 ]; then echo "fr24feed_arm-le_233 dziala"; else screen -dmS fr24feed /usr/local/bin/fr24feed_arm-le_233 --fr24key=TYPEYOURKEYHERE ---lattitude=ENTER --longitude=ENTER; fi > /home/pi/fr24arm-le.log 2>&1
That’s it! It will start at latest in 30 minutes.

This work is licensed under a Creative Commons Attribution-NonCommercial-NoDerivatives 4.0 International License (c) 2014-2024 Łukasz C. Jokiel, [CC BY-NC-SA 4.0 DEED](https://creativecommons.org/licenses/by-nc-sa/4.0/)