OpenVPN on Raspberry Pi – Access to the Internet via split-tunnel
Would you like to connect from any place, usually using open WiFi network in town, at friends or airport – with your’re own home network? Virtual Private Network (VPN) is here to allow you to log-in securely to your home network, with additional perk of using it to get secure Internet access.
What will you need?
Hardware:
- Raspberry Pi (A, A+ or B, B+, 2, Zero)
- Home Router with Port Forwarding or Virtual Server support – any will do
Software:
- Raspberry Pi OS (formely Raspbian) – standard Linux distribution for Raspberry Pi
- OpenVPN – free OpenVPN server
- OpenVPN – clients – different for Linux, Android, MS Windows etc.
As you see nothing fancy.
Security
Let’s talk about how we should secure our access:
- physical access to your Raspberry Pi should be controlled (only you)
- access to /etc should be restricted to the user that OpenVPN is running under
- the files with .key are TOTALLY SECRET
- the certificate .crt or .crs – are to be sent, lost, revoked – could be always renewed.
- each device connecting to OpenVPN server (PC, tablet, smartphone) has it’s own key/certificate pair
Let's do it!
Well, as always the first thing is to update out RPi – let’s login via ssh or console:
sudo apt-get update && sudo apt-get upgradeNow, lets install OpenVPN package:
sudo apt-get install openvpnAll commands used require root privileges, so I suggest to enter:
sudo -iNext we should configure the server, first to generate SSL certificates, that allow securing of the connection and also – authentication.
All files should be stored in /etc, let’s create appropriate folder and copy over the example files to create certs, which reside in Raspberry Pi OS here:
cd /etc/openvpn
mkdir easy-rsa
cp -R /usr/share/easy-rsa/* /etc/openvpn/easy-rsa/
If you’re on the newer Jessie, as noted in comments by Dom/OloX – folder with examples is located in /usr/share:
cd /etc/openvpn
mkdir easy-rsa
cp -R /usr/share/easy-rsa/* easy-rsa/
Examples provided by easy-rsa package default to USA based data. Wait, what ? It’s all about the fact that the certificate has to have identification – who’s the authority that issued it. Since it’s going to be ours – we should put some familiar data here to identify it later.
Let’s edit the file (or accept the fact that all certificates are from San Francisco…):
sudo nano /etc/openvpn/easy-rsa/varsThe changes are about the folder where we store the certs and keys, length of the asymetrical key – it’s usually1024 – but 2048 might be too much from RPi 1, or even 2 or 3. Let’s use the value of 1024:
export EASY_RSA=”/etc/openvpn/easy-rsa”
export KEY_SIZE=1024
export KEY_COUNTRY="US"
export KEY_PROVINCE="CA"
export KEY_CITY="SanFrancisco"
export KEY_ORG="Fort-Funston"
export KEY_CN=SerwerOVPN
export KEY_ALTNAMES="OVPN"
Country code – PL, county/voivodeship: WA and so on – use what you like or don’t, but the KEY_CN – this should be changed.
Let’s prepare to create the keys:
cd /etc/openvpn/easy-rsa
touch keys/index.txt
echo 01 > keys/serial
. ./vars  # set environment variables
./clean-all
Now we will build a certificate authority:
./build-caAll you need to do is to confirm values previously entered in vars:
Generating a 1024 bit RSA private key
..........++++++
..........................++++++
writing new private key to 'ca.key'
-----
You are about to be asked to enter information that will be incorporated
into your certificate request.
What you are about to enter is what is called a Distinguished Name or a DN.
There are quite a few fields but you can leave some blank
For some fields there will be a default value,
If you enter '.', the field will be left blank.
-----
Country Name (2 letter code) [PL]
Do katalogu keys trafią pliki ca.key i ca.cert.
The folder keys will now have ca.key and ca.cert.
Now, important port – generating the key to our system:
./build-key-server serverWe will be asked to provide password. STOP. OK, enter a password – but then you will also have to enter it with each connection. We can remove the password and lower our security – the choice is yours!
Please enter the following 'extra' attributes
to be sent with your certificate request
A challenge password []:
Odpowiamy yes na pozostałe pytania i tym razem w katalogu keys pojawią się pliki : server.crt oraz server.key w (/etc/openvpn/easy-rsa/keys/), które to będą podpisane Twoim certyfikatem root.
Answer yes to remaining questions and you will get in folder keys new files: server.crt and server.key in (/etc/openvpn/easy-rsa/keys/), they will be signed with your root certificate.
Now let’s build the Diffie-Hellmann parameters required for client and server to talk to each other. The process is quite interesting – check out https://en.wikipedia.org/wiki/Diffie%E2%80%93Hellman_key_exchange
./build-dhThis produces 1024.pem file, change the name to dh1024.pem
Now lets build the pairs – files – for a client:
./build-key client1…along with the password:
./build-key-pass client1That’s nearly the end – now let’s generate common HMAC key for TLS:
openvpn --genkey --secret /etc/openvpn/easy-rsa/keys/tls.keyLet’s copy all the files /etc/openvpn/mykeys/
cd /etc/openvpn/easy-rsa/keys
mkdir -p /etc/openvpn/mojeklucze
cp dh1024.pem /etc/openvpn/mojeklucze
cp ca.crt /etc/openvpn/mojeklucze
cp server.crt /etc/openvpn/mojeklucze
cp server.key /etc/openvpn/mojeklucze
cp tls.key /etc/openvpn/mojeklucze
It’s time to configure our OpenVPN server using certificates and keys.
First create the /etc/openvpn/openvpn.conf file with following entries:
push "redirect-gateway"
push "dhcp-option DNS 8.8.8.8"
push "dhcp-option DNS 192.168.11.1"
server 192.168.22.0 255.255.255.0
dev tun
verb 5
proto udp
keepalive 10 120
port 1194
dh /etc/openvpn/mojeklucze/dh1024.pem
ca /etc/openvpn/mojeklucze/ca.crt
cert /etc/openvpn/mojeklucze/server.crt
key /etc/openvpn/mojeklucze/server.key
user nobody
group nogroup
persist-key
persist-tun
status /var/log/openvpn-status.log
verb 3
client-to-client
log-append /var/log/openvpn
The configuration of the server will get all the traffic coming from it (apart from static routes on the client – accessing the other LAN) and steer it to tunnel. Thanks to this we will also have Internet access through our tunnel and VPN (but check below!). The resolvers for DNS operation – let’s use Google and our local as secondary. The important line is ‘server’ this creates a network used only for the actual connection – so use private network you don’t use anywhere. The port is 1194 – we will have to reconfigure our home router for connection – see below for Port Forwading options. The protocol used is UDP.
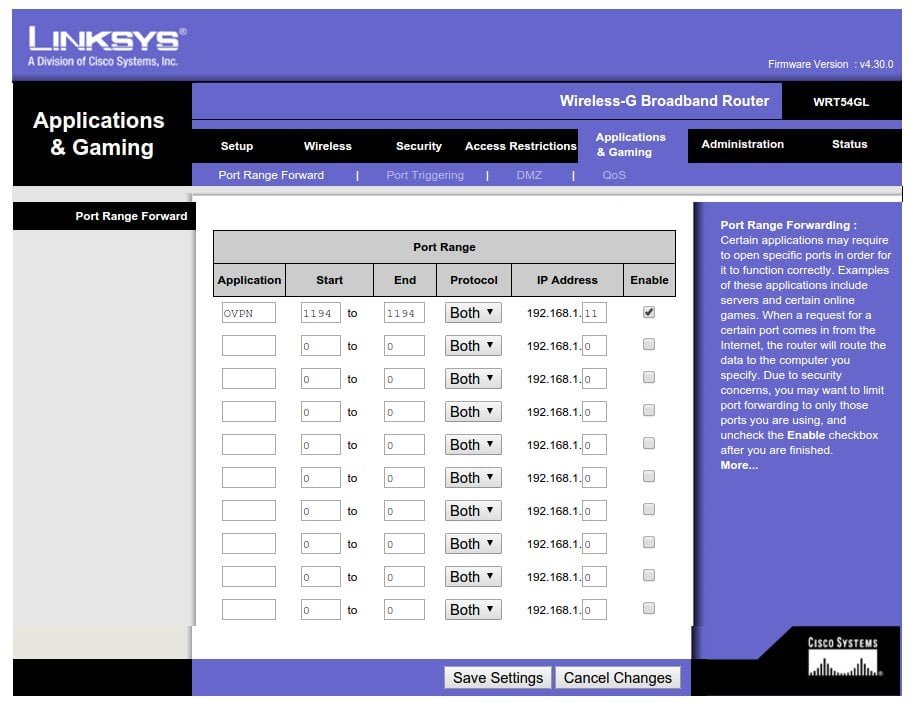
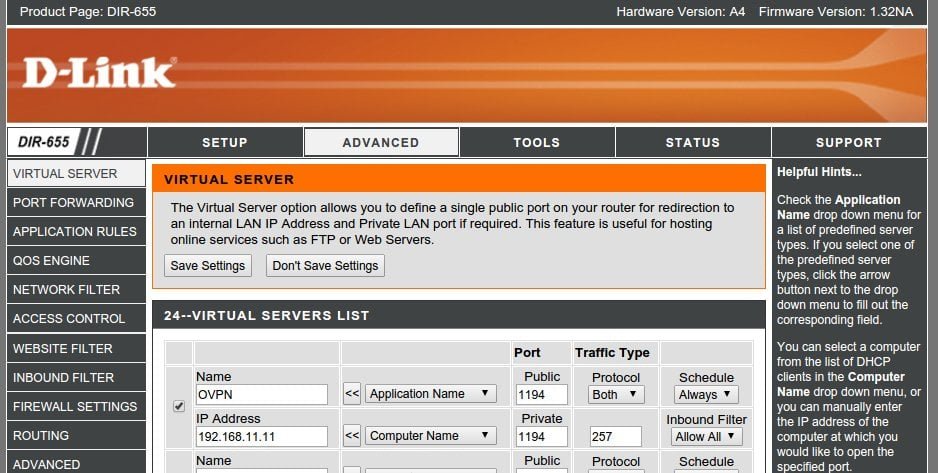
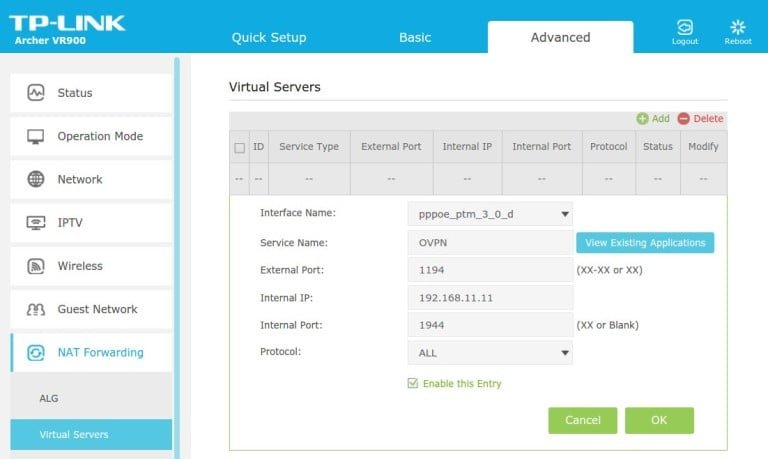
Port forwarding
The forwarding of the public port from your router to private port on Raspberry Pi is quite easy to configure:


Split-tunnel – safe access to Internet by means of VPN
To allow split-tunnel – we need to add configuration at the end of the /etc/rc.local file.
Do mind that you need to change the example RPi address of 192.168.11.11 to yours, and as mentioned above – choose unused VPN – here: 192.168.22.0/24
The file should have following lines:
echo "Enabling routing for proper VPN operation..."
echo 1 > /proc/sys/net/ipv4/ip_forward
echo "Remote port mapping for VPN service..."
iptables -t nat -A INPUT -i eth0 -p udp -m udp --dport 1194 -j ACCEPT
echo "SNAT of the VPN addresses to allow split-tunneling..."
iptables -t nat -A POSTROUTING -s 192.168.22.0/24 -o eth0 -j SNAT --to-source 192.168.11.11
exit 0
Client
Let’s configure the client – first mobile devices – Android. Download the OpenVPN (check for fakes!) and after installing – it’s going to ask for .ovpn file. Let’s create it, don’t forget to change the IP_ADDRESS_OR_FQDN_OF_THE_SERVER to your OpenVPN server.
Back to console of your Raspberry Pi:
cd /etc/openvpn/mojeklucze/
echo "client" > client.ovpn
echo "verb 4" >> client.ovpn
echo "dev tun" >> client.ovpn
echo "connect-retry-max 5" >> client.ovpn
echo "connect-retry 5" >> client.ovpn
echo "resolv-retry infinite" >> client.ovpn
echo "proto udp" >> client.ovpn
echo "remote IP_ADDRESS_OR_FQDN_OF_THE_SERVER 1194" >> client.ovpn
echo "nobind" >> client.ovpn
echo "persist-key" >> client.ovpn
echo "persist-tun" >> client.ovpn
echo "keepalive 10 900" >> client.ovpn
echo "inactive 3600" >> client.ovpn
echo "set CLIENT_CERT 0" >> client.ovpn
echo "<ca>;" >> client.ovpn
cat ca.crt | grep -A 100 "BEGIN CERTIFICATE" | grep -B 100 "END CERTIFICATE" >> client.ovpn
echo "</ca>" >> client.ovpn
echo "<cert>" >> client.ovpn
cat client1.crt | grep -A 100 "BEGIN CERTIFICATE" | grep -B 100 "END CERTIFICATE" >> client.ovpn
echo "</cert>" >> client.ovpn
echo "<key>" >> client.ovpn
cat client1.key | grep -A 100 "BEGIN PRIVATE KEY" | grep -B 100 "END PRIVATE KEY" >> client.ovpn
echo "</key>" >> client.ovpn
We got – client.ovpn. Rewiev the file, change: proto to udp, remote – IP address – to our public router address (or name if we have Dynamic DNS service), and enter the IP addresses into server line. Remove any ca cert key references to the files if they exist in imported example. The ready file goes to Android device – import, run connect and there it is!. Do mind that for mobile devices (i.e. Android/iOS- OpenVPN Connect requires the certificates to be embedded in the *.ovpn file!

This work is licensed under a Creative Commons Attribution-NonCommercial-NoDerivatives 4.0 International License (c) 2014-2024 Łukasz C. Jokiel, [CC BY-NC-SA 4.0 DEED](https://creativecommons.org/licenses/by-nc-sa/4.0/)